# Custom JWT Login with Embedded Wallets
> Custom JWT Login with Embedded Wallets | Embedded Wallets
Embedded Wallets supports integration with custom login providers through [JWT-based](https://www.jwt.io/introduction#what-is-json-web-token) authentication schemes, allowing developers to maintain their existing authentication infrastructure while leveraging Web3Auth's wallet and key management capabilities. Custom authentication can be implemented using industry-standard cryptographic algorithms such as RSA or ECDSA signatures.
To use this feature, developers must ensure that their JWTs adhere to the [JWT specification](https://datatracker.ietf.org/doc/html/rfc7519). Each JWT must be signed using a private key, and its corresponding public key must be accessible via a [JWKS (JSON Web Key Set)](https://datatracker.ietf.org/doc/html/rfc7517) endpoint. Web3Auth will use this endpoint to verify the integrity and authenticity of incoming tokens during login.
Once the custom JWT login is working, developers can proceed to add it as a custom connection in the dashboard.
## Set up a custom JWT connection
:::success Create Custom Connection
To use this feature, developers must go to the **Custom Connections** tab in the [dashboard](https://developer.metamask.io).
:::
Follow these steps to create a custom JWT connection:
1. Visit the [Embedded Wallets dashboard](https://developer.metamask.io).
1. Go to the **Custom Connections** section.
1. Click on the **Settings** icon near the **Custom Connection**.
1. Enter the **Auth Connection ID**.
1. Paste the **JWKS Endpoint**.
1. Paste a sample **JWT Token** to auto populate the best **JWT validations** possible.
1. Select the **JWT user identifier**: `email`, `sub` or `custom`.
1. (Optional) Toggle the case sensitivity of `User Identifier`.
1. Click on **Add Custom Validations** to add validations manually.
1. Type iss as a field and `your-issuer` as a value.
1. Type aud as a field and `your-audience` as a value.
1. Click the **Add Connection** button to save the settings.
## Create a JWT
To generate the JWT, developers may use a package of their choice. Web3Auth provides documentation and examples using both the `jsonwebtoken` and `jose` libraries.
### Generate a private key
Developers can generate a private key using the `openssl` command-line tool. This private key will be used to sign the ID token.
Developers can run the following command in the terminal to generate a new `privateKey.pem` file containing the `RSA256` key details.
```bash
openssl genrsa -out privateKey.pem 2048
```
Once the private key is generated, developers can generate the public key which can be used to verify the JWT and [convert it to JWKS](#how-to-convert-pem-to-jwks).
```bash
openssl rsa -in privateKey.pem -pubout -out publicKey.pem
```
Developers can run the following command in the terminal to generate a new `privateKey.pem` file containing the `ECDSA` key details.
```bash
openssl ecparam -name secp256k1 -genkey -noout -out ec-secp256k1-privateKey.pem
```
Once the private key is generated, developers can generate the public key which can be used to verify the JWT and [convert it to JWKS](#how-to-convert-pem-to-jwks).
```bash
openssl ec -in ec-secp256k1-privateKey.pem -pubout -out ec-secp256k1-publicKey.pem
```
### Install the JWT library
Developers can install a JWT library of their choice. Following are the documentation and examples using both the `jsonwebtoken` and `jose` libraries.
```bash npm2yarn
npm i jsonwebtoken
npm i jose
```
### Generate a JWT
Web3Auth provides documentation for using RSA256 and ECDSA—two of the most commonly used algorithms—for generating JWTs with the `jsonwebtoken` package. For a complete list of supported algorithms, developers can refer to the [jsonwebtoken documentation](https://www.npmjs.com/package/jsonwebtoken#algorithms-supported).
Developers can create an `index.js` file and insert the following code snippet to generate a JWT using the `RSA` algorithm.
```tsx
var privateKey = fs.readFileSync('privateKey.pem')
var token = jwt.sign(
{
sub: 'faj2720i2fdG7NsqznOKrthDvq43', // must be unique to each user
name: 'Mohammad Shahbaz Alam',
email: 'shahbaz@web3auth.io',
aud: 'urn:my-resource-server', // -> to be used in Custom Authentication as JWT Field
iss: 'https://my-authz-server', // -> to be used in Custom Authentication as JWT Field
iat: Math.floor(Date.now() / 1000),
exp: Math.floor(Date.now() / 1000) + 60 * 60,
},
privateKey,
{ algorithm: 'RS256', keyid: '1bb9605c36e69386830202b2d' } // <-- Replace it with your kid. This has to be present in the JWKS endpoint.
)
console.log(token)
```
Developers can create an `index.js` file and insert the following code snippet to generate a JWT using the `ECDSA` algorithm.
```tsx
var privateKey = fs.readFileSync('ec-secp256k1-privateKey.pem')
var token = jwt.sign(
{
sub: 'faj2720i2fdG7NsqzncndijwnKrthDvq43',
name: 'Mohammad Shahbaz Alam',
email: 'shahbaz@web3auth.io',
aud: 'urn:my-resource-server', // -> to be used in Custom Authentication as JWT Field
iss: 'https://my-authz-server', // -> to be used in Custom Authentication as JWT Field
iat: Math.floor(Date.now() / 1000),
exp: Math.floor(Date.now() / 1000) + 60 * 60,
},
privateKey,
{ algorithm: 'ECDSA', keyid: '1bb9605c36e69386830202b2d' } // <-- Replace it with your kid. This has to be present in the JWKS endpoint.
)
console.log(token)
```
Create an index.js file and paste the below code to generate the JWT using RSA algorithm.
```tsx
var privateKey = fs.readFileSync('privateKey.pem')
var publicKey = fs.readFileSync('publicKey.pem')
const jwt = await new jose.SignJWT({ 'urn:example:claim': true })
.setProtectedHeader({ alg: 'RS256', kid: '1bb9605c36e69386830202b2d' }) // <-- Replace it with your kid. This has to be present in the JWKS endpoint.
.setIssuedAt()
.setIssuer('https://my-authz-server')
.setAudience('urn:my-resource-server')
.setExpirationTime('2h')
.sign(privateKey)
console.log(jwt)
// Verifying the JWT using Remote JWK Set.
// This is just to show how the Verify works, look above to set-up custom jwt verifier on the Embedded Wallets dashboard.
// Check the steps below to see how once can generate the JWKS
const JWKS = jose.createRemoteJWKSet(new URL('https://my-authz-server/.well-known/jwks.json'))
const { payload, protectedHeader } = await jose.jwtVerify(jwt, JWKS, {
issuer: 'https://my-authz-server',
audience: 'urn:my-resource-server',
})
console.log(protectedHeader)
console.log(payload)
```
:::warning Facing issue with JWT?
Check out the [troubleshooting page](/embedded-wallets/troubleshooting/jwt-errors).
:::
## Usage
Since the **Custom Connection** details are available from the dashboard, developers don't need to pass any additional parameters to the `Web3AuthProvider`.
:::tip
Follow our [quickstart](/quickstart/?product=EMBEDDED_WALLETS&walletAggregatorOnly=NO&framework=REACT&stepIndex=0) to set up the basic flow.
:::
### Log in with JWT
```tsx title="App.tsx"
const getIdToken = async () => {
// Get id token from server
const res = await fetch('http://localhost:8080/api/token', {
method: 'POST',
headers: {
'Content-Type': 'application/json',
},
})
const data = await res.json()
return data?.token
}
const loginWithJWT = async () => {
try {
const idToken = await getIdToken()
// focus-start
await connectTo(WALLET_CONNECTORS.AUTH, {
authConnection: AUTH_CONNECTION.CUSTOM,
authConnectionId: 'w3a-node-demo',
idToken,
extraLoginOptions: {
isUserIdCaseSensitive: false,
},
})
// focus-end
} catch (err) {
console.error(err)
}
}
```
## What are JWKS?
JWKS stands for JSON Web Key Set. It's a set of keys containing the public keys that should be used to verify any JSON Web Token (JWT) issued by the authorization server and signed using the RS256 signing algorithm.
### How to create JWKS?
- Most of the login providers that support JWT-based login will provide you this URL, such as Firebase, Google, Auth0, AWS Cognito etc.
- Firebase: `https://www.googleapis.com/service_accounts/v1/jwk/{your-project-id}`
- Auth0: `https://{your-domain}/.well-known/jwks.json`
- Google: `https://www.googleapis.com/oauth2/v3/certs`
- AWS Cognito: `https://cognito-idp.{region}.amazonaws.com/{userPoolId}/.well-known/jwks.json`
- If you are using your own custom JWT, you will need to convert your PEM file to JWKS.
### How to convert PEM to JWKS
If you're using `jose` or `jsonwebtoken` library, you can use the following steps to convert your PEM file to JWKS.
1. Create a Private Key using openssl.
```bash
openssl genrsa -out privateKey.pem 2048
```
This privateKey will be used to sign the token.
2. Using the above privateKey.pem file, create a Public Key.
```bash
openssl rsa -in privateKey.pem -pubout -out publicKey.pem
```
This publicKey.pem file will be converted to JWKS.
3. Convert the publicKey.pem file to JWKS.
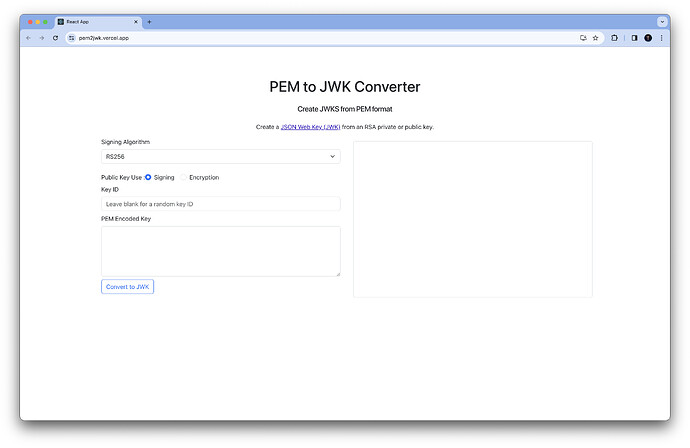
Now, look for a tool that converts `.pem` to `jwk(s)` format.
- One of the tools is https://pem2jwk.vercel.app/
- Select Signing Algorithm: `RS256`
- Select Public Key Use: `Signing`
- Key ID: `paste-yours` or leave it blank to generate a random one.
- PEM encoded key: `{paste-the-publicKey-pem-file-s-content-here}`
- Click on the **Convert to JWK** button.
4. To complete the process, you need to save the output as a `.json` file, host it on your server, and make sure it's publicly accessible.
This will give you the `JWKS Endpoint`, which is required when setting up a **Custom JWT Verifier** on the Embedded Wallets dashboard.