Use JSON Web Token (JWT)
JSON Web Token (JWT) is an internet standard (RFC 7519) that defines a process for secure data exchange between two parties.
Infura projects can use JSON Web Tokens to authorize users and external parties. This allows developers to enhance the security profile of their dapps by configuring the expiry time and scope of JWTs.
Infura supports using JWTs for Web3 networks.
Use JWTs with Infura projects
Only authenticated users can access Infura projects by including JWTs in request headers.
Workflow
- Set up your project's Infura security settings to enforce authorized access with JWTs.
- A user logs into the project application and receives a JWT.
- Each request the user makes to Infura with the application's API key includes the JWT in the header.
- The JWT is verified and the request is successful, or the request is rejected if the JWT is invalid.
JWTs may also include allowlists that enforce further restrictions.
Set up a project to use JWTs
Generate keys
Generate your private and public key pair. Infura supports the RS256 and ES256 cryptographic algorithms. If you are unfamiliar with generating keys, follow the Authenticate with JWT tutorial.
Ensure your private key stays private!
Upload the public key
Upload the contents of the public key file that you generated earlier:
-
In the dashboard, select the API key, then select the Settings tab.
infoYou must implement separate security settings for each API key.
-
Select Require JWT for all requests to enforce JWTs on all requests.
infoYou can use allowlists to specify a subset of requests that must use JWTs.
-
Provide a unique name for your JWT public key, which can help you manage multiple keys.
-
Paste the public key into the JWT Public Key input box. It looks something like this:
-----BEGIN PUBLIC KEY-----
MIIBIjANBgkqhkiG9w0BAQEFAAOCAQ8AMIIBCgKCAQEAr7VlNytvNFt9wVkjJ8vG
L4F0+id4kS1CpG7UMh1kghrLg9KMb8gauy7Bxk6PRz5Ckv1FnG4FL+Z3Cdzwd6c8
jJlzJxbRTYvNi3elqAyItE3tRl6CatRur49t9nGepgFOrwmPP5We52G5O0BsW6Mx
w/neqQH+Y/bXqs0PG/0ZbpTyr044Lh+p9grSuPIogIGIY5JM4AI+fpdH6hVnA7od
PkinkWhQqAW+F8jngwZK+JCFS1GAeobTZVbvsiHZQGuP/T7hqE8z5Q8HYO4ymnkI
MPH6zSKhSxsQRs/kWU5lXqY67ORC3DIMA+I/AJujLuoqC+YaMP0fO81XjrwXPf2j
4wIDAQAB
-----END PUBLIC KEY----- -
Select Add to add the key to the settings.
-
The key has a Name, ID, Fingerprint. These are used for creating and verifying JWTs. You'll need the ID to generate the JWT.
infoFor key rotation, upload up to three keys for each API key.
Send requests with JWTs
If JWTs are required for all requests, the following fails with an invalid JWT error.
curl -X POST \
  -H "Content-Type: application/json" \
  --data '{"jsonrpc": "2.0", "id": 1, "method": "eth_blockNumber", "params": []}' \
  "https://optimism-sepolia.infura.io/v3/<YOUR-API-KEY>"
To get the request to pass, generate a JWT, and add it to the request.
Generate a JWT
Generate a JWT with an online tool, or programmatically:
Online tool
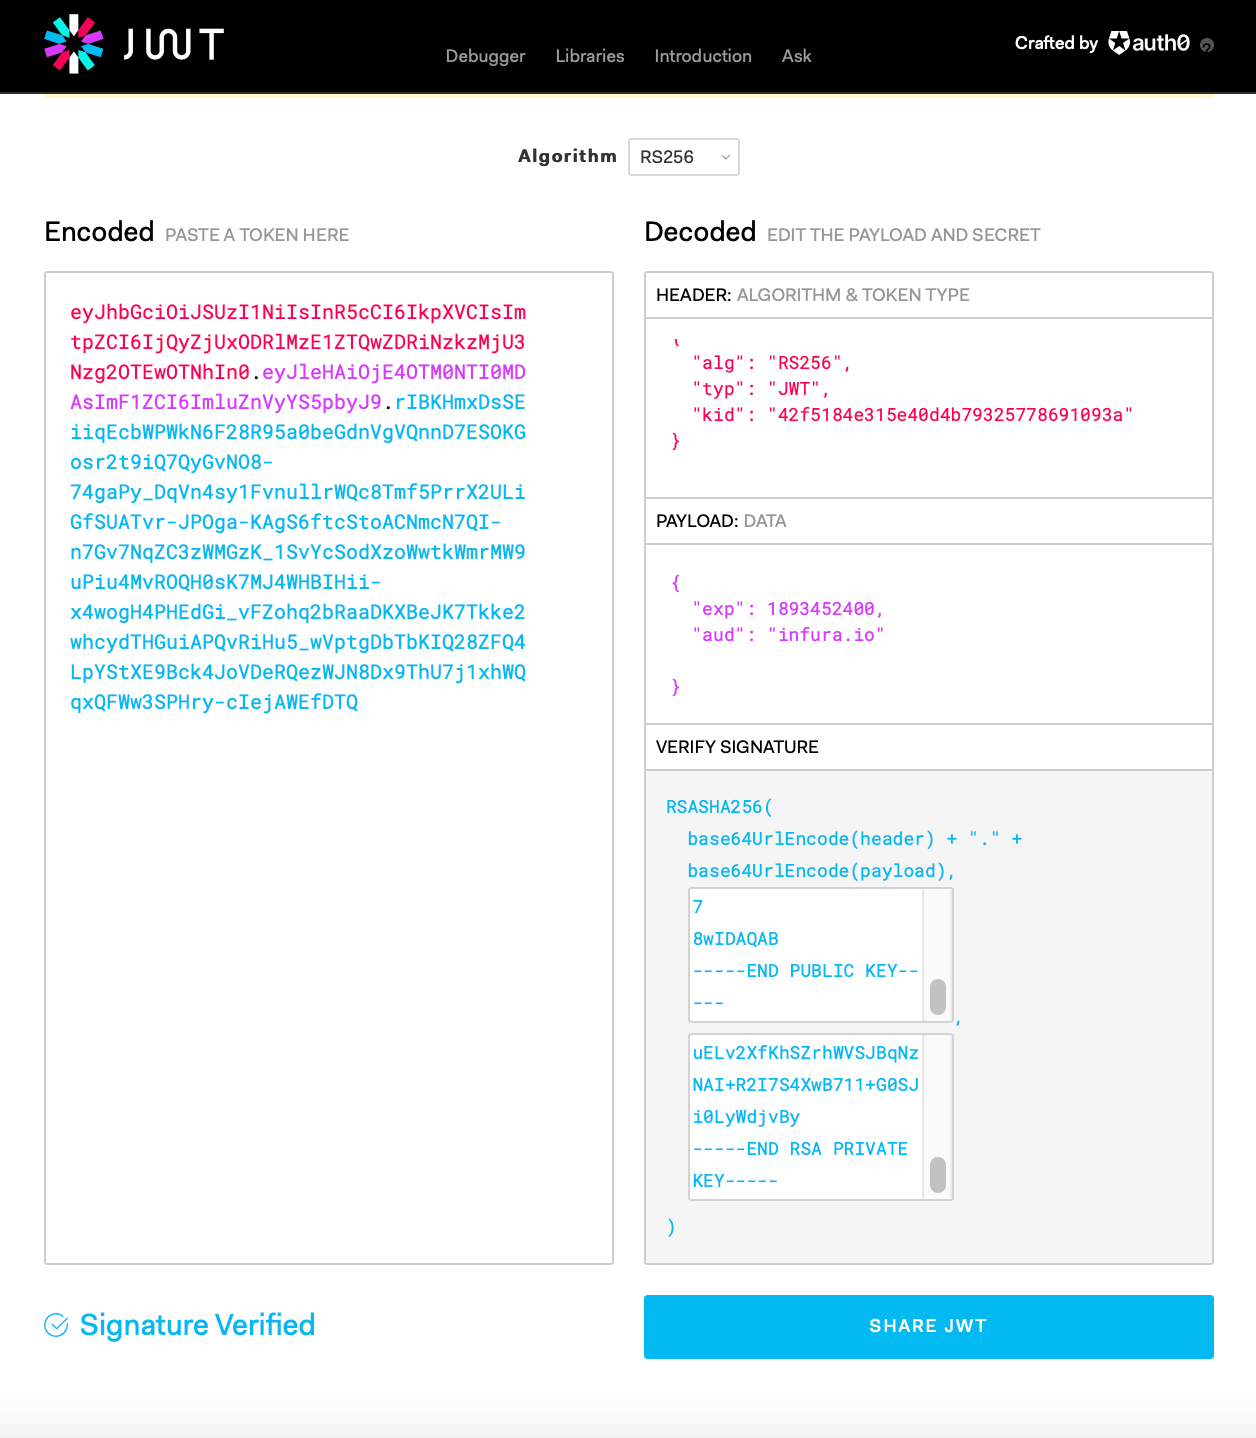
The following example uses the jwt.io site to generate the JWT:
- Use a supported algorithm (
RS256orES256) and declare it in thealgheader field. - Specify
JWTin thetypheader field. - Include the JWT
IDin thekidheader field. - Have an unexpired
exptimestamp in the payload data. - Specify
infura.ioin theaudfield. - Add the public key and private key created earlier into the Verify Signature section.

To generate a timestamp for testing, use an online timestamp converter tool.
Programmatically
Developers typically create the JWT token from their keys programmatically. To learn more, follow the tutorial demonstrating how to create and apply a JWT with Node.js.
Apply the JWT
Pass the encoded token as part of the -H "Authorization: Bearer entry:
curl -X POST \
  -H "Content-Type: application/json" \
  -H "Authorization: Bearer  eyJhbGciOiJSUzI1NiIsInR5cCI6IkpXVCIsImtpZCI6IjQyZjUxODRlMzE1ZTQwZDRiNzkzMjU3Nzg2OTEwOTNhIn0.eyJleHAiOjE4OTM0NTI0MDAsImF1ZCI6ImluZnVyYS5pbyJ9.rIBKHmxDsSEiiqEcbWPWkN6F28R95a0beGdnVgVQnnD7ESOKGosr2t9iQ7QyGvNO8-74gaPy_DqVn4sy1FvnullrWQc8Tmf5PrrX2ULiGfSUATvr-JPOga-KAgS6ftcStoACNmcN7QI-n7Gv7NqZC3zWMGzK_1SvYcSodXzoWwtkWmrMW9uPiu4MvROQH0sK7MJ4WHBIHii-x4wogH4PHEdGi_vFZohq2bRaaDKXBeJK7Tkke2whcydTHGuiAPQvRiHu5_wVptgDbTbKIQ28ZFQ4LpYStXE9Bck4JoVDeRQezWJN8Dx9ThU7j1xhWQqxQFWw3SPHry-cIejAWEfDTQ" \
  --data '{"jsonrpc": "2.0", "id": 1, "method": "eth_blockNumber", "params": []}' \
  "https://mainnet.infura.io/v3/<YOUR-API-KEY>"
{"jsonrpc": "2.0", "id": 1, "result": "0x1cc23d4"}
Next steps
Set up allowlists
Allowlists restrict specific activity to users without JWTs. For example, in a system with proxy contracts, allowlists can restrict a user to sending requests to their own proxy only.
JWT allowlists override all other security settings for requests.
A JWT with allowlists must have all of the above settings, plus properly formatted allowlists.
Set allowlists with one or more of the following keys:
methodsaddressesoriginsuser_agents
The following example JWT definition allows only eth_getBalance requests, on a single specified address, coming from any HTTP origin, and any user agent.
Header:
{
  "alg": "RS256",
  "typ": "JWT",
  "kid": "<YOUR JWT ID>"
}
Payload:
{
  "exp": 1893452400, // a long way off
  "aud": "infura.io",
  "methods": ["eth_getBalance"],
  "addresses": ["0x1937c5c515057553ccbd46d5866455ce66290284"]
}
curl -X POST \
  -H "Content-Type: application/json" \
  -H "Authorization: Bearer  eyJhbGciOiJSUzI1NiIsInR5cCI6IkpXVCIsImtpZCI6IjQyZjUxODRlMzE1ZTQwZDRiNzkzMjU3Nzg2OTEwOTNhIn0.eyJleHAiOjE4OTM0NTI0MDAsImF1ZCI6ImluZnVyYS5pbyIsImFkZHJlc3NlcyI6WyIweDE5MzdjNWM1MTUwNTc1NTNjY2JkNDZkNTg2NjQ1NWNlNjYyOTAyODQiXSwibWV0aG9kcyI6WyJldGhfZ2V0QmFsYW5jZSJdfQ.SwonSCVgybdT_GPQXe5SfhujmyzG-qpgH6zzVEzLZbZpZKsVQzOzFu3X1zHydvITzl3WhKXq5q8acHdMEO8y2TpUeyeLB25A-bnSZj8YlxacQvsnSNzm4ySJrTglmjD9rsr6JzKfgub03RuHuz0AWWO4omD6UrPcfcpxUF9YXEcT98SIsodPP_41WPrRvBuo8kLhmByr2Qs-XQRCDzxHxHb5jXI5RzoxLeEjTU_3GfWqgqgh4XHogcK43_VFGz9gv8QEoUiPnySafV6H80WXo12XwTeF-lr2cy_q79ZOvSp0WC4_j8dQMhNwj2dhZv1VPsViZMeHjBAJwK5mzIxBlQ" \
  --data '{"jsonrpc": "2.0", "id": 1, "method": "eth_getBalance", "params": [ "0x1937c5c515057553ccbd46d5866455ce66290284", "latest"]}' \
  "https://mainnet.infura.io/v3/<YOUR-API-KEY>"
{"jsonrpc": "2.0", "id": 1, "result": "0x1a66d865b7f200"}
Verify JWTs
To identify the public key you have used to create a JWT, verify it with the FINGERPRINT.
Take the private key, output it in DER encoding; take the SHA256 of that, and base64 encode the result.
- RSA key
- EC (256) key
openssl rsa -in private.pem -pubout -outform DER | openssl sha256 -binary | openssl base64
openssl ec -in private.pem -pubout -outform DER | openssl sha256 -binary | openssl base64
Learn more
- Learn more about keeping your Infura secrets safe.
- Follow a tutorial to create and apply a JWT to authenticate an
eth_blockNumberAPI request.