Create a React dapp with local state
This tutorial walks you through integrating a simple React dapp with MetaMask. The dapp has a single JSX component, which is used for managing local state. You'll use the Vite build tool with React and TypeScript to create the dapp.
React is familiar to most web developers and is standard in web3. It makes it easy to work with state management, build components that use a one-way data flow, and re-render those components upon state changes.
You can view the dapp source code on GitHub.
Prerequisites
- Node.js version 18+
- npm version 9+
- A text editor (for example, VS Code)
- The MetaMask extension installed
- Basic knowledge of TypeScript and React
Steps
1. Set up the project
Set up a new project using Vite, React, and TypeScript by running the following command:
npm create vite@latest vite-react-local-state -- --template react-ts
Install the node module dependencies:
cd vite-react-local-state && npm install
Launch the development server:
npm run dev
This displays a localhost URL in your terminal, where you can view the dapp in your browser.
If you use VS Code, you can run the command code . to open the project.
If the development server has stopped, you can run the command npx vite or npm run dev to
restart your project.
Open the project in your editor.
To start with a blank slate, replace the code in src/App.tsx with the following:
import "./App.css"

const App = () => {
  return (
    <div className="App">
      <h2>Wallets Detected:</h2>
    </div>
  )
}

export default App
2. Import EIP-6963 interfaces
The dapp will connect to MetaMask using the mechanism introduced by EIP-6963.
EIP-6963 introduces an alternative wallet detection
mechanism to the window.ethereum injected provider.
This alternative mechanism enables dapps to support
wallet interoperability by discovering multiple injected
wallet providers in a user's browser.
Update the Vite environment variable file, src/vite-env.d.ts, with the types and interfaces
needed for EIP-6963 and
EIP-1193:
/// <reference types="vite/client" />

// Describes metadata related to a provider based on EIP-6963.
interface EIP6963ProviderInfo {
  walletId: string
  uuid: string
  name: string
  icon: string
}

// Represents the structure of a provider based on EIP-1193.
interface EIP1193Provider {
  isStatus?: boolean
  host?: string
  path?: string
  sendAsync?: (
    request: { method: string; params?: Array<unknown> },
    callback: (error: Error | null, response: unknown) => void
  ) => void
  send?: (
    request: { method: string; params?: Array<unknown> },
    callback: (error: Error | null, response: unknown) => void
  ) => void
  request: (request: {
    method: string
    params?: Array<unknown>
  }) => Promise<unknown>
}

// Combines the provider's metadata with an actual provider object, creating a complete picture of a
// wallet provider at a glance.
interface EIP6963ProviderDetail {
  info: EIP6963ProviderInfo
  provider: EIP1193Provider
}

// Represents the structure of an event dispatched by a wallet to announce its presence based on EIP-6963.
type EIP6963AnnounceProviderEvent = {
  detail: {
    info: EIP6963ProviderInfo
    provider: EIP1193Provider
  }
}

// An error object with optional properties, commonly encountered when handling eth_requestAccounts errors.
interface MMError {
  code?: string
  message?: string
}
3. Create store file
Create a store file to manage the state of the detected wallet providers. This file provides a centralized place to store and synchronize the detected wallet providers, ensuring that your dapp always has access to the latest provider information.
Create a src/hooks directory, and create a file store.ts in that directory with the following code:
// Extends WindowEventMap interface, including a custom event eip6963:announceProvider.
declare global {
  interface WindowEventMap {
    "eip6963:announceProvider": CustomEvent
  }
}

// Array that stores detected wallet providers and their details.
let providers: EIP6963ProviderDetail[] = []

// Object containing two methods. The store holds the state of detected Ethereum wallet providers.
// It's implemented as an external store, making it available for subscription and synchronization
// across the dapp.
export const store = {
  // Returns the current state of providers.
  value: () => providers,
  // Subscribes to provider announcements and updates the store accordingly.
  // Takes a callback function to be invoked on each store update, returning a function to
  // unsubscribe from the event.
  subscribe: (callback: () => void) => {
    function onAnnouncement(event: EIP6963AnnounceProviderEvent) {
      if (providers.map((p) => p.info.uuid).includes(event.detail.info.uuid))
        return
      providers = [...providers, event.detail]
      callback()
    }
    window.addEventListener("eip6963:announceProvider", onAnnouncement)
    window.dispatchEvent(new Event("eip6963:requestProvider"))

    return () =>
      window.removeEventListener("eip6963:announceProvider", onAnnouncement)
  },
}
4. Sync provider state with React component
With the store in place, create a custom hook that synchronizes the provider state with the React component.
Use the useSyncExternalStore React hook
to subscribe to changes in the provider store, and to ensure the component re-renders whenever
the store updates.
Create a file useSyncProviders.ts in the hooks directory with the following code:
import { useSyncExternalStore } from "react"
import { store } from "./store"

export const useSyncProviders = () =>
  useSyncExternalStore(store.subscribe, store.value, store.value)
useSyncExternalStore takes three arguments:
- A subscription function to listen for changes in the external store (
store.subscribe). - A function to get the current value of the store (
store.value). - An initial value for the store (
store.value).
As an alternative to useSyncExternalStore, you can use the useState React hook to manage the
provider state, and the useEffect React hook to subscribe to changes in the store.
When the React component mounts, you can subscribe to changes in the store, set the initial state
using the current value from the store, and return a cleanup function to unsubscribe from the store
when the component unmounts.
5. Create connect buttons
Create an array of buttons that the user can select to connect to the EIP-6963 wallet providers that you detect.
Update src/App.tsx to the following:
import { useSyncProviders } from "./hooks/useSyncProviders"
import "./App.css"

const App = () => {
  const providers = useSyncProviders()

  const handleConnect = async (providerWithInfo: EIP6963ProviderDetail) => {
    try {
      const accounts = (await providerWithInfo.provider.request({
        method: "eth_requestAccounts",
      })) as string[]
    } catch (error) {
      console.error(error)
    }
  }

  return (
    <div className="App">
      <h2>Wallets Detected:</h2>
      <div className="providers">
        {providers.length > 0 ? (
          providers?.map((provider: EIP6963ProviderDetail) => (
            <button
              key={provider.info.uuid}
              onClick={() => handleConnect(provider)}
            >
              <img src={provider.info.icon} alt={provider.info.name} />
              <div>{provider.info.name}</div>
            </button>
          ))
        ) : (
          <div>No Announced Wallet Providers</div>
        )}
      </div>
    </div>
  )
}

export default App
To style the buttons, update src/App.css to the following:
.App {
  min-width: 100vw;
  min-height: 100vh;
  text-align: center;
}

.providers {
  display: flex;
  flex-flow: column wrap;
  justify-content: space-between;
  align-items: center;
  align-content: center;
  gap: 1em;

  padding: 0.6em 1.2em;
}

.providers button {
  width: 12em;
}

.providers button img {
  width: 2em;
}
Run npm run dev to test the dapp.
Make sure you're signed in to MetaMask and that it's not currently connected to your dapp.
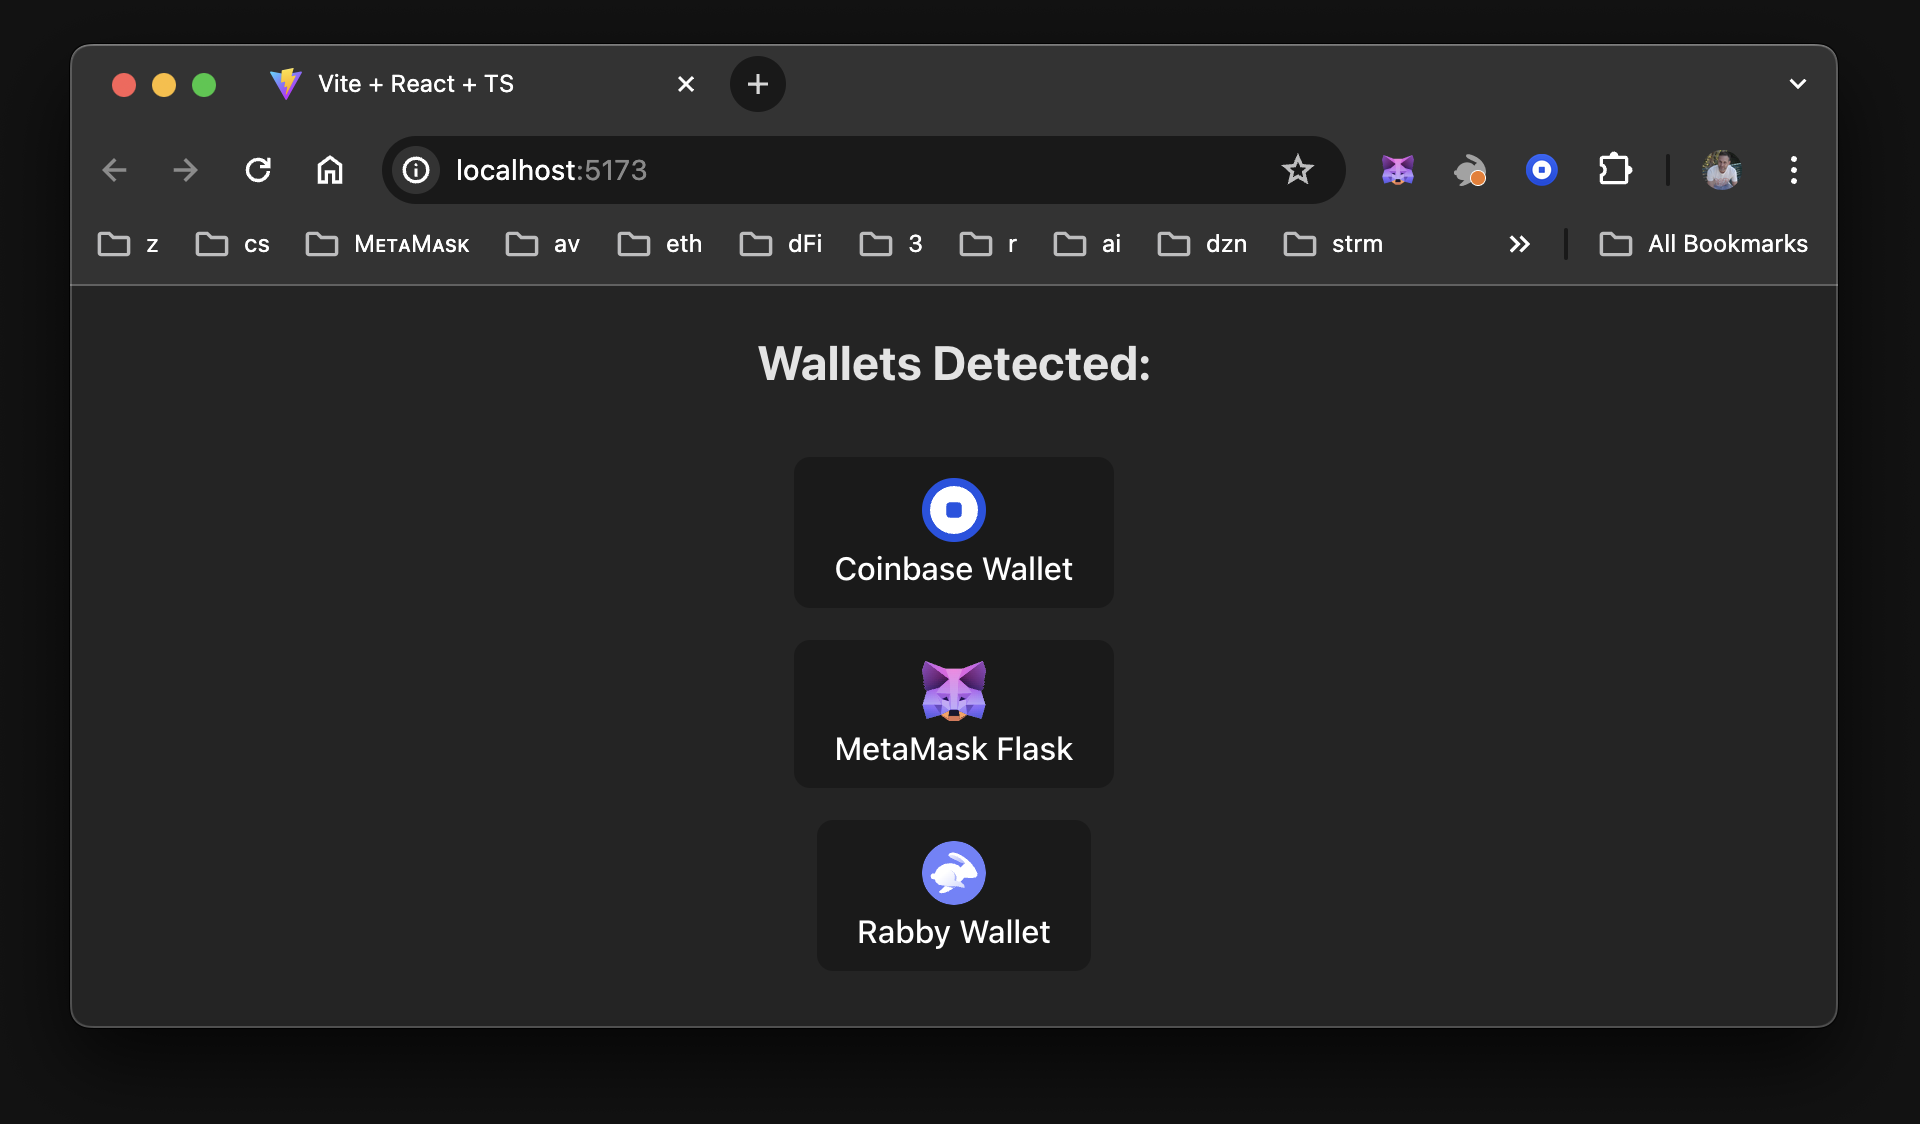
If you have multiple EIP-6963 wallets installed in your browser, something like the following should display:
6. Show connected wallet address
Indicate when a wallet has been connected to by displaying the user's address on the page.
Update everything above the return statement in src/App.tsx to the following, which
adds code to format and display user addresses, and handle errors:
import { useState } from "react"
import { useSyncProviders } from "./hooks/useSyncProviders"
import "./App.css"

const App = () => {
  const [selectedWallet, setSelectedWallet] = useState<EIP6963ProviderDetail>()
  const [userAccount, setUserAccount] = useState<string>("")
  const providers = useSyncProviders()

  const [errorMessage, setErrorMessage] = useState("")
  const clearError = () => setErrorMessage("")
  const setError = (error: string) => setErrorMessage(error)
  const isError = !!errorMessage

  // Display a readable user address.
  const formatAddress = (addr: string) => {
    const upperAfterLastTwo = addr.slice(0, 2) + addr.slice(2)
    return `${upperAfterLastTwo.substring(0, 5)}...${upperAfterLastTwo.substring(39)}`
  }

  const handleConnect = async (providerWithInfo: EIP6963ProviderDetail) => {
    try {
      const accounts = await providerWithInfo.provider.request({
        method: "eth_requestAccounts"
      }) as string[]

      setSelectedWallet(providerWithInfo)
      setUserAccount(accounts?.[0])
    } catch (error) {
      console.error(error)
      const mmError: MMError = error as MMError
      setError(`Code: ${mmError.code} \nError Message: ${mmError.message}`)
    }
  }
  ...
Below the return statement in src/App.tsx, update the div with the class of .App to the
following:
  ...
  return (
    <div className="App">
      <h2>Wallets Detected:</h2>
      <div className="providers">
        {
          providers.length > 0 ? providers?.map((provider: EIP6963ProviderDetail) => (
            <button key={provider.info.uuid} onClick={() => handleConnect(provider)} >
              <img src={provider.info.icon} alt={provider.info.name} />
              <div>{provider.info.name}</div>
            </button>
          )) :
            <div>
              No Announced Wallet Providers
            </div>
        }
      </div>
      <hr />
      <h2>{userAccount ? "" : "No"} Wallet Selected</h2>
      {userAccount &&
        <div className="selectedWallet">
          <img src={selectedWallet?.info.icon} alt={selectedWallet?.info.name} />
          <div>{selectedWallet?.info.name}</div>
          <div>({formatAddress(userAccount)})</div>
        </div>
      }
      <div className="mmError" style={isError ? { backgroundColor: "brown" } : {}}>
        {isError &&
          <div onClick={clearError}>
            <strong>Error:</strong> {errorMessage}
          </div>
        }
      </div>
    </div>
  )
Add the following CSS to src/App.css to style the error message:
.mmError {
  height: 36px;
  padding: 16px;
  color: #efefef;
  background-color: transparent;
}
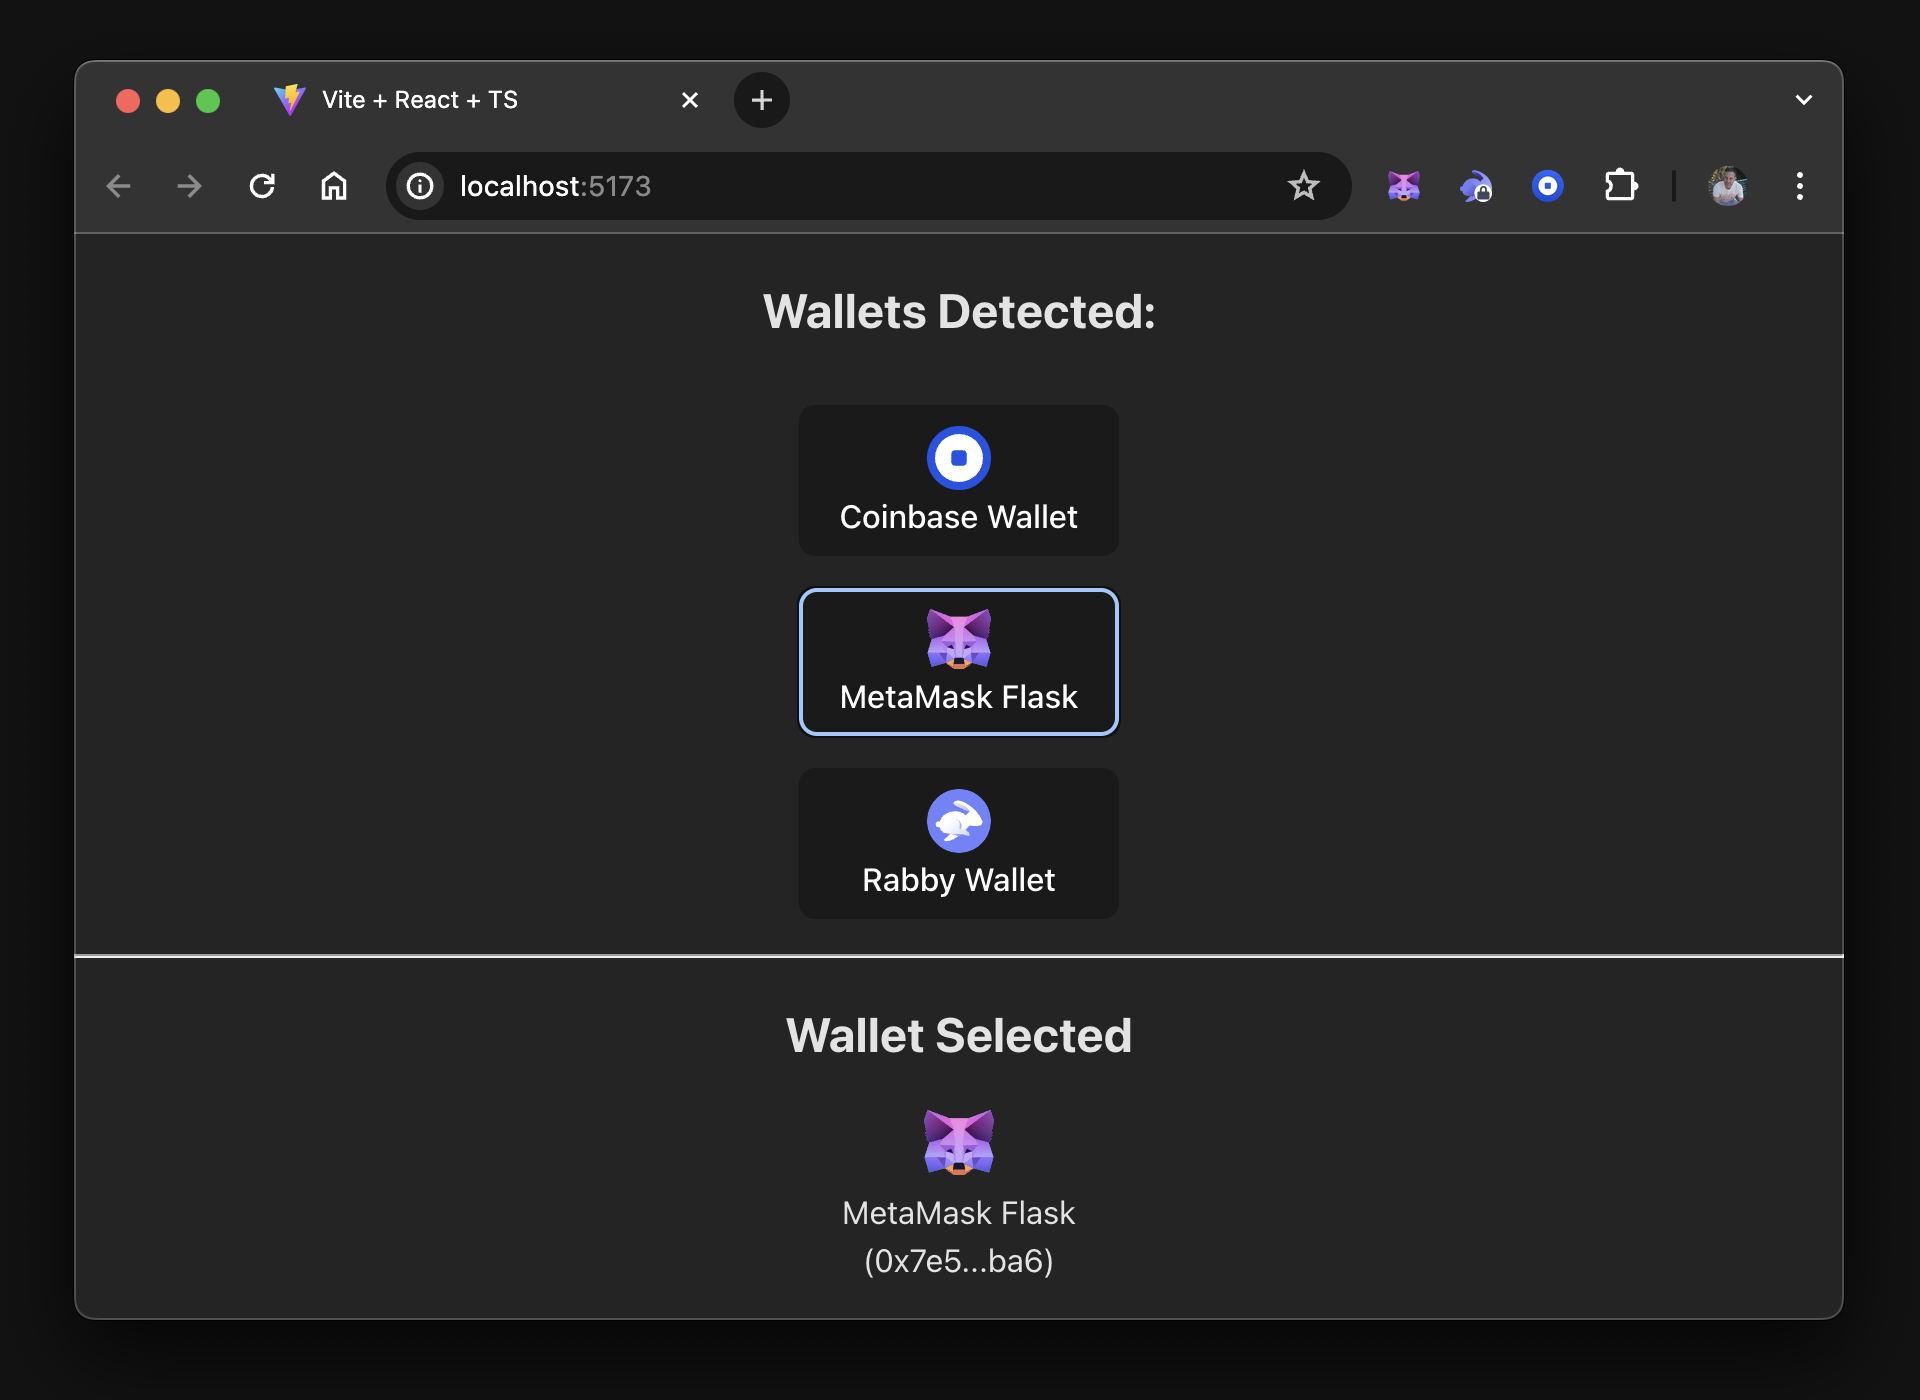
Your dapp should look similar to the following:
Troubleshoot
Doesn't look right?
This tutorial creates classNames for each section's parent div in the JSX (HTML).
If your dapp does not look the same but functions properly, check the naming of your classes and
their corresponding CSS.
Doesn't function properly?
Try the following:
- Check the code examples against your own.
- Place
consolestatements in key areas such ashandleConnectandstore. - Clone the GitHub repository containing the project source code and run it.
If you find inconsistencies or erroneous code, feel free to create an issue on the repository.
Next steps
This tutorial walked you through creating a single component dapp using Vite, detecting wallet providers using EIP-6963, and managing the state in React locally. You can view the project source code on GitHub.
As a next step, you can create a React dapp with global state.
This follow-up tutorial walks you through adding multiple components that use a global state.
You'll use React's Context API to manage the state
globally and move away from using the useSyncExternalStore.
This is a more realistic (but also more complex) approach for building a real-world dapp.